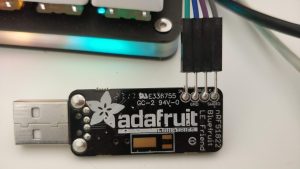
I wanted to document the steps that are necessary to transform the Adafruit Bluetooth LE Friend (https://www.adafruit.com/product/2267) to an passive Bluetooth 4.0 Low Energy Sniffer device. This sniffer can be used to monitor the bluetooth communication between 2 LE devices. Which makes it a useful and cheap tool for security research and development.
The Bluetooth LE Friend comes in 2 versions – one with a preinstalled Bootloader, Softdevice and Application to control the on-board Nordic nRF51822 chipset using AT Commands. This Is already really useful for prototyping your own bluetooth applications. It supports OTA updates and Adafruit provides an Android application together with some demo projects.
As mentioned, Adafruit offers the same hardware in a Sniffer version, which comes with custom Sniffer firmware from Nordic preinstalled.
Flashing the Nordic Firmware on the BLE Friend
So, you own a BLE Friend, want to Sniff Bluetooth Traffic and don’t want to spend another 24$+shipping for the Sniffer version? Flash your BLE Friend!
You’ll need:
- The sniffer firmware in version 1.0.1
- SWD Programmer (In this example, we are using the STLink V2)
- openocd installed
- Adafruits Adalink Tool
Step 1: Wire up your programmer
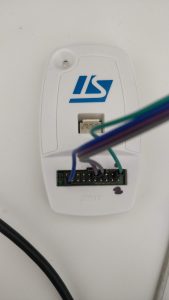
I’m using the STLink V2 SWD programmer (the white box).

You need to connect 4 lines to it.
- Ground (Blue)
- Target Voltage for sensing (Green)
- SWCLK (Purple)
- SWDIO (Grey)
Now, you need to connect those lines to the SWD connection pads on the bottom of the PCB of your LE Friend. Soldering them on is the fasted way in my opinion.

Note that we don not need to connect the reset pin – the reset is done via the SWDIO line.
Step 2: Prepare
For simplicity, you’ll flash the LE Friend using Adalink. (https://github.com/adafruit/Adafruit_Adalink). Adalink is a python wrapper for OpenOCD that abstracts away the complexity of OpenOCD – which is good and bad a the same time.
on osx:
$ git clone https://github.com/adafruit/Adafruit_Adalink.git
$ cd Adafruit_Adalink
$ virtualenv --python $(which python2.7) venv
$ source venv/bin/activate
$ pip install click
There are 2 files that we need to collect:
- The Booloader (https://raw.githubusercontent.com/adafruit/Adafruit_BluefruitLE_Firmware/03110f6819d2e8c0928ce1f3879df22dab562447/bootloader/bootloader_0002.hex)
- The Sniffer Firmware (https://raw.githubusercontent.com/adafruit/Adafruit_BluefruitLE_Firmware/03110f6819d2e8c0928ce1f3879df22dab562447/sniffer/1.0.1/ble-sniffer_nRF51822_1.0.1_1111_Sniffer_No32kHz.hex)
Save those files – you’ll need them in the next step.
Step 3: Flash the firmware
Connect your Programmer with your computer and Plug the LE Friend into USB – This powers the nrf51 – the programmer alone does not provide any power to the LE Friend.
With adalink, we can simply run
$ adalink nrf51822 \
--programmer stlink \
--wipe \
--program-hex path/to/the/bootloader_0002.hex \
--program-hex path/to/the/ble-sniffer_nRF51822_1.0.1_1111_Sniffer_No32kHz.hex
As I said, I’m not a big fan of abstracting complicated tasks away from the Hacker: A look under the hood of Adalink reveals what it does. Based on your programmer, it loads the necessary target and board configuration (the -f flags) and executes a bunch of commands (the -c flags). The call above results in 2 subprocess calls:
1: The wipe command in adalink for the stlink adapter:
$ openocd -f interface/stlink-v2.cfg \
-f target/nrf51.cfg \
-c  init \
-c "reset init" \
-c halt \
-c "nrf51 mass_erase" \
-c exit
This clears the flash memory. After the wipe is done, it loads the bootloader and the sniffer program
$ openocd \
-f interface/stlink-v2.cfg \
-f target/nrf51.cfg \
-c  init \
-c "reset init" \
-c halt \
-c "flash write_image /abs/path/to/bootloader_0002.hex 0 ihex" \
-c "flash write_image /abs/path/to/ble-sniffer_nRF51822_1.0.1_1111_Sniffer_No32kH.hex 0 ihex" \
-c "reset run" \
-c exit
If everything worked, the Bluefruit LE should boot with the sniffer firmware after the reset and you should see the blue led flickering – this indicates that you were successful.
